


And the custom guitar gig bag, thanks to the people of
Cease and Seekle!!!


| ||||
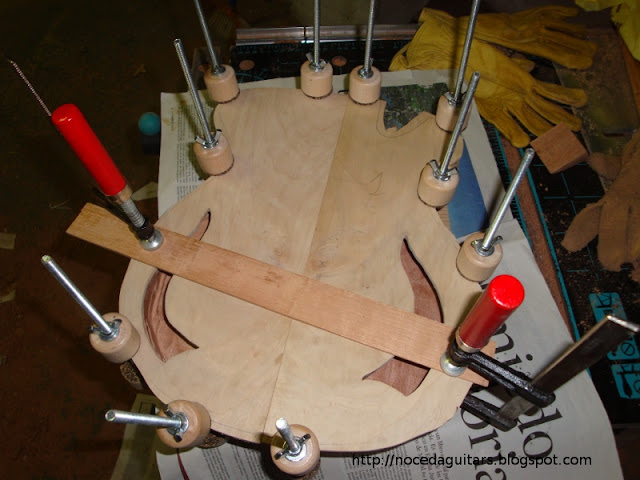
| Las plantillas son un punto importante en la creación de una guitarra. Aunque sólo vayamos a construir una única unidad de un modelo, es interesante crear una plantilla. Nos será más fácil transferir nuestra idea del diseño a la realidad. Podemos crear plantillas para casi todo, el cuerpo, la pala, la cavidad de los controles, las pastillas. En cualquier caso nos facilitarán las cosas y, en caso de necesitarlo, reproducir un modelo del que ya no tenemos un ejemplar disponible para su copia. Hay diferentes métodos para afrontar esta tarea. Explicaré el que yo utilizo. Se necesitan dos maderas de contrachado, una de unos 3 mm de grosor y la otra de aproximadamente 1 centímetro. Sobre la madera más fina dibujamos el contorno de nuestra plantilla, ya sea un nuevo cuerpo, la pala o cualquier otro elemento de la guitarra. Podemos hacerlo a mano alzada o podemos pegar un dibujo generado por ordenador. El siguiente paso es recortar este patrón y a continuación dejar los bordes lo más perpendiculares posible, con un taladro de columna y un tambor de lijado o con un taco y manualmente.El utilizar una madera más fina en este paso nos facilitará mucho la vida. Puede que no consiguamos dejarlo completamente perpendicular a la base, lo que tendremos que considerar es que el borde exterior de nuestro rebaje será el que dicte la forma final de nuestra plantilla. Ahora es el turno de pasar la plantilla a nuestra madera de 1 centímetro. Esta última madera será la que utilicemos en el trabajo diario, siendo la de 3 mm nuestro "master" para poder sacar nuevas copias en caso de que se deteriore nuestra plantilla de trabajo. Dibujamos sobre nuestra madera de trabajo el contorno de la plantilla master y recortamos lo más posible el contorno. Ahora pegamos la plantilla master sobre la plantilla de trabajo con cinta de doble cara, repasamos el contorno con una fresadora con guía y ya tenemos nuestra plantilla de trabajo. Para utilizar la plantilla, lo único que hemos de hacer es seguir los pasos que hemos dado para pasar de la plantilla master a la plantilla de trabajo. Templates are an important point in building a guitar. Although we will build only one unit of a model, it is interesting to create a template. We will make it easier to transfer our design idea into reality. We can create templates for almost everything, the body, the headstock, the control cavity, etc. In any case, this will facilitate things and, if needed, to reproduce a pattern that no longer have a copy available for copying. There are different methods to acomplish this task. I explain the way I do it. We need two plywood sheets, one of about 3 mm thick and the other about 1 centimeter. On the finest plywood, draw the outline of our design, be it a new body, the headstock, or any other element of the guitar. We can do it by hand or we can stick a computer generated drawing. The next step is to cut this pattern and then make the edges perpendicular as possible with a drill press and a drum sander or by hand with a sanding stick. The finer plywood in this step makes our life a lot easier. If you can't leave it completely perpendicular to the base, you have to consider that the outer edge of our template will dictates the final form. Now is time to transfer the template to our 1 cm plywood. This will be the template we use in daily work, being 3 mm plywood our "master" to get new copies in case of eroding our job template. We draw on 1cm plywood the outline of the master template and cut out the outline as possible. Now fix the master template on the job template with double-sided tape, we follow the outline with a routing machine with a ball bearing guide and we already have our working template. To use the template, all you have to do is follow the steps we have taken to move from the master template to the daily work template. |

|
||||
Diseñando una guitarra. Hay consideraciones básicas que hemos de tener en cuenta a la hora de crea nuestro nuevo modelo que rompa esquemas. Lo más sencillo, si es la primera vez que se aborda esta tarea, es partir de un modelo conocido, que sabemos que funciona, e irle aplicando modificaciones a nuestro gusto. Simplificando mucho las cosas, tenemos dos tipos básicos de guitarra, la Les Paul de Gibson, y la Stratocaster de Fender. Una con dos pastillas dobles, mástil encolado y cuerpo con tapa, y la otra, tres pastillas simples, mástil atornillado y cuerpo de una pieza. Partiendo de estos esquemas podemos ir ampliando un poco más las cosas, y empezar a fijarnos en cosas no tan evidentes, como pueden ser la pala y al disposición de los clavijeros, 6 en fila, 3 y 3, selector de pastillas de tres posiciones o de seis, control independiente de volumen y tono para cada pastillas, longitud de escala, tipo de material de la cejilla, adornos, colores, grosores de cuerda y sigues y sigues hasta el infinito. Como se puede ver, las posibilidades son casi infinitas, y estamos hablando únicamente de las partes más evidentes de la guitarra. Disfruta de tu diseño. Designing a guitar. There are basic considerations that we must take into account when establishing our new model, "the next big thing". The simplest, if it is the first time that deals with this task, is start from a well known model, that we know works, and customizing it to our liking. To oversimplify things, we have two basic types of guitar, the Gibson Les Paul and Fender Stratocaster. One with two humbuckers pickups, set neck and body with top, and the other one with three single pickups, bolt on neck and body in one piece. Based on these schemes, we can expand them a bit more and start to look at things not so obvious, such as the headstock and distribution of tunners, 6 in row, 3 left and 3 right, three or six position toggle switch, independent control of volume and tone for each pickup, scale length, type of material of the nut, decorations (binding, inlays), colors, guitar string gauge, to infinity and beyond!. As you can see, the possibilities are endless, and we are talking only of the most obvious parts of the guitar. Enjoy your design. |

